4 safe steps to update NPM packages [Cheat Sheet]
Have you ever tried to update a npm package and then realized that it breaks all other packages in your Javascript project?
This is a common problem for web developers, luckily there are some easy steps to take before updating a module.
In this blog post, I will show you how to update npm packages without breaking your project by following 4 simple steps:
- Understand npm package versioning
- Audit installed npm packages
- Update only one npm package at time
- Test your code after updating npm packages
Step 1: Understand npm package versioning
Versioning is an important part of npm and how to use updates safely when developing web applications.
Most npm packages follow semantic versioning guidelines.
Semantic versioning means that developers should compose a package version of three numbers separated by periods (e.g., "0.12.31").
MAJOR.MINOR.PATCH versioning format
The first number, called the major version, indicates how significant a release this is in relation to other releases with the same minor and patch levels. Major version number indicates incompatible API changes.
The second number, called the minor version, indicates how much new functionality has been introduced since the last significant release; for instance, if this change was only small fixes or enhancements to existing features and no behavior changes were made then it would result in a higher value. Minor releases are not as risky as major version because they typically introduce new features, but they are not as risky as major updates because no API changes were made.
The third number is called the patch version and it indicates how much bug fixes or enhancements have been introduced since the last minor release; for instance, if this change was only small fixes or enhancements to existing features and no behavior changes were added.
What do the caret (^) and tilde (~) mean?
In package.json, a version can have a ^ in front (e.g. ^0.12.31), meaning the latest minor release may be safely installed.
Tilde (~) in front (e.g., ~0.12.31) means the latest patch release is safe to install.

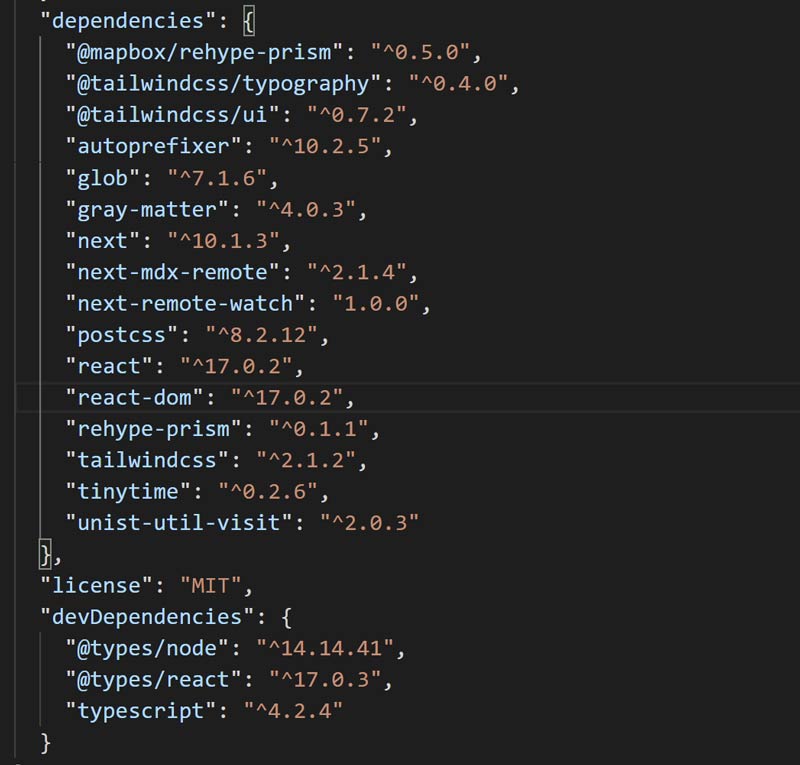
An example of npm packages that are listed as dependencies in the package.json file. All dependencies have a caret (^) in front, showing that it is safe to install the latest minor versions.
package.json
package.json is a file that keeps track of all the packages your app needs to run properly, as well as settings for how it should behave when running on different platforms and environments.
Step 2: Audit installed npm packages
Before you update npm packages, figure out if you have a good reason to.
It is better to stick with the package version that works. That way you will not have a risk of something breaking.
Primary reasons for upgrading npm packages are:
- Recent version of the package having a feature that we want
- Fixed bugs in the latest version of an npm package
- Updated dependencies for another package that you are using
- A security vulnerability in the npm package
- Upgrade of the environment where the project is running is not compatible with the the current version of the npm package
Couple of npm commands that will help you audit your packages before upgrading:
npm list --depth 0lists all packages at the top levelnpm auditchecks for security vulnerabilities or out-of-date versionsnpm outdatedlists report of package versions compared to versions specified inpackage.jsonfile
npm list --depth 0
npm list --depth 0 lists all installed npm packages, but only at the top level.
Listing packages at the top level is enough most of the time. Top-level dependencies usually take care of their inner dependencies.
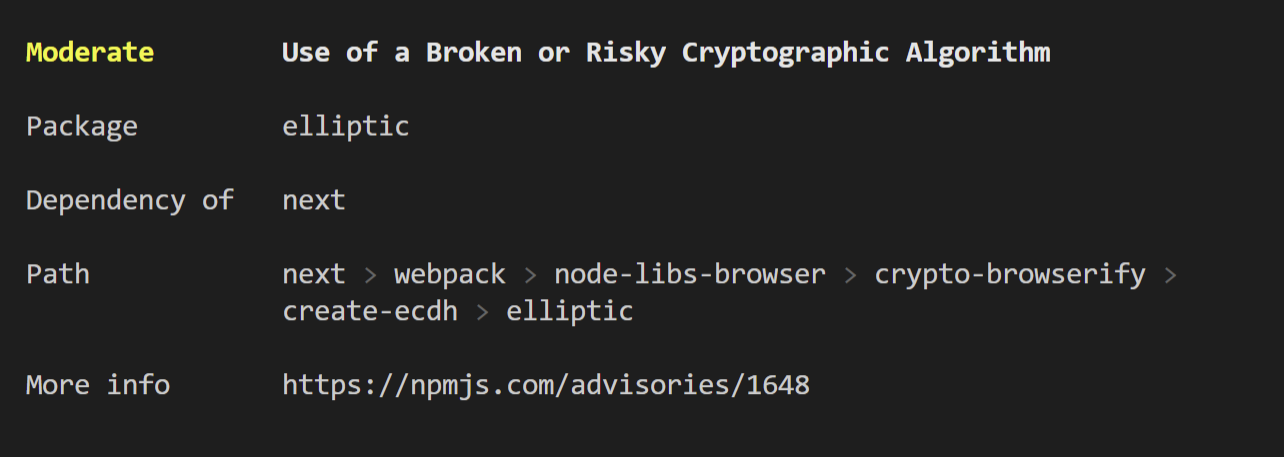
npm audit
npm audit will run a security vulnerability check against your project and report any found issues. It is not perfect, but it helps to find potential problems if you are using npm packages that have security vulnerabilities. It's not perfect because not all vulnerabilities are reported to npm.

npm audit shows you a list of vulnerable packages, including the npm dependency tree.
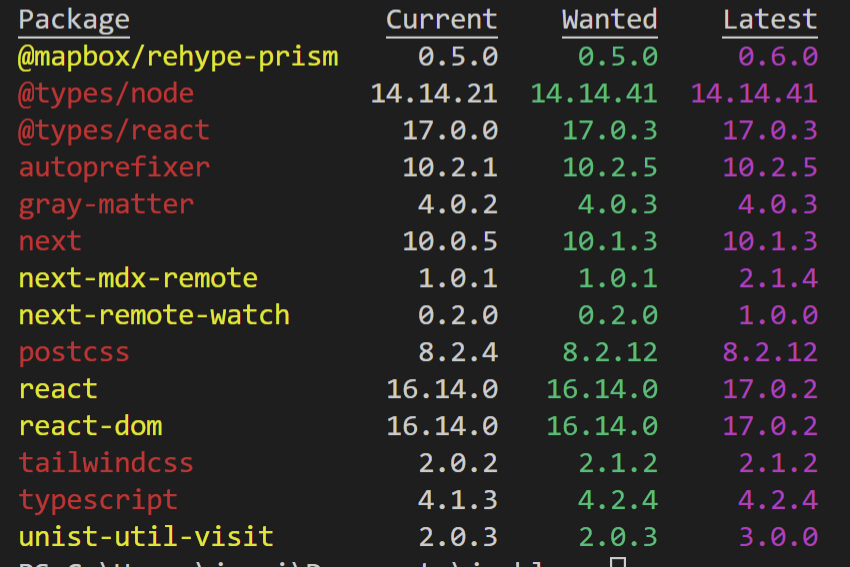
npm outdated
npm outdated will report any out-of-date packages in your project.
It shows current, wanted and latest versions compared to versions specified in package.json file.
- Current: is the currently installed version.
- Wanted: The maximum version of the package that is allowed by the version range in package.json.
- Latest: version of the package is the one that is tagged as "latest" in the npm registry.
Note: npm outdated command only shows the direct dependencies of the root project. But if you want to see other dependencies also, then use "--all."

npm outdated prints out a list of all installed packages that have updates available.
Check for breaking changes before you update
Some npm packages will introduce breaking changes, which may cause errors when using the module.
Before making a breaking change, package developers often add "Breaking Changes" messages to the console output. It means that the module will change in future versions and developers need to keep an eye out for it.
To see if there are any breaking changes, you can also look at the "Breaking Changes" section of the package's readme file.
You can usually find package's readme file in:
- npm package's page on the npm registry
- inside of a module directory, check
node_modulesfolder inside of your project - project's website (or GitHub)
Step 3: Update only one package at time
When updating, we need to be careful to only update packages we want. There is no need to update all of your modules at the same time.
Start by making updates in small batches and test each batch for any issues that might arise. This will allow you to find out how it's affecting your project, and it will let you isolate any errors.
npm update
Changing the package version in package.json file and running npm install will most likely not do anything because already installed package version satisfies the versioning in the package.json file.
Rather than using npm install, you can use the npm update command to upgrade already installed packages. When you run a npm update, npm checks if there are newer versions out there that satisfy specified semantic versioning ranges that you specified in package.json and installs them.
To update a specific npm package, run the following in console:
npm update package_nameHow to revert npm package updates?
If there are any bugs, you can easily undo the changes with these two commands:
npm uninstall package_name
npm install package_name@version
The @version should be the same version that you had installed previously.
Step 4: Test your code after installing new packages
In order to make sure your code still works after updating npm packages, it's important that you test the functionality before deploying. This is because a package update may cause errors in your application if you are not careful. To avoid these issues, I recommend running all tests on server and client side as well as manually checking for any JavaScript error messages throughout the site.
Steps:
- Run all unit and integration tests from both serverside and clientside by running
npm testor equivalent command for your project. - Review package logs for clues about what caused an issue or where things went wrong during installation
These 3 simple steps can help you avoid breaking your project by carefully installing new npm packages.
What are some of the other ways that people have broken their projects? Let us know in the comments below, and we'll write a blog post on them!
Bonus Tip: Clear npm cache
As of npm@5, the npm cache self-heals from corruption issues and data extracted from the cache is guaranteed to be valid. If you want to make sure everything is consistent, use 'npm cache verify' instead. On the other hand, if you're debugging an issue with the installer, you can use
npm install --cache /tmp/empty-cacheto use a temporary cache instead of nuking the actual one.
Sometimes npm doesn't pull the latest version of the package because it has an older version stored in cache. As of npm@5, cache issues should not be happening. But they still do sometimes.
To clear npm cache, run npm cache clean --force. This command clears npm's cache of all the packages that your project has installed with npm install or npm update.
It does not remove any dependencies from package.json, but it may help resolve a dependency issue if there is an outdated version in the cache and you can't find which one it is by looking through the packages list.
Cheat Sheet: 6 Commands To Help You Update npm Packages
This cheat sheet will make it easy to safely update npm packages in your node application. It includes a list of commands that will help you keep up with the latest updates and avoid breaking changes.
- Use
npm list --depth 0to list all the packages in your package directory - Use
npm auditto find out which of your npm dependencies are vulnerable. - Use
npm outdatedto list the packages that are out of date with respect to what is installed in package.json - Use
npm update package_nameto update an individual package that has already been installed. - Use
npm uninstall package_nameandnpm install package_name@versionto revert to a specific version. - Use
npm cache clean --forceto clear npm's cache of all the packages that have been installed.
Josip Miskovic is a software developer at Americaneagle.com. Josip has 10+ years in experience in developing web applications, mobile apps, and games.
Read more posts →- Step 1: Understand npm package versioning
- MAJOR.MINOR.PATCH versioning format
- What do the caret (^) and tilde (~) mean?
- Step 2: Audit installed npm packages
- npm list --depth 0
- npm audit
- npm outdated
- Check for breaking changes before you update
- Step 3: Update only one package at time
- npm update
- How to revert npm package updates?
- Step 4: Test your code after installing new packages
- Bonus Tip: Clear npm cache
- Cheat Sheet: 6 Commands To Help You Update npm Packages

I've used these principles to increase my earnings by 63% in two years. So can you.
Dive into my 7 actionable steps to elevate your career.
